Exposure Bracketing Explained - Photo Biker 28

What is exposure bracketing?
If you are new to the term, my basic explanation is “a technique where you take multiple pictures of the same image at different exposures, then layer them to create one image”.
Exposure bracketing works well when shooting in conditions where the camera cannot take a natural-looking photograph. For example, when a bright light - the sun - causes extreme highlights and shadows.
Now, you might not see it this way with the naked eye, but unfortunately, your camera cannot capture the same view. In fact, it sees the whole world in black and white.
Your camera also doesn’t have a brilliant creative brain to make the right decisions. That’s all you my friend!
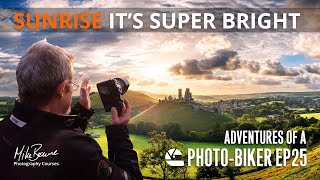
In my video above, I shoot a great picture directly towards the sun.
It’s clear that the camera can’t create the image I am seeing with my eyes. But, with exposure bracketing, I can get around this and make an image I love that looks more like what I could see with my own eyes.
How exposure bracketing works (watch the video)
To recap. I set my camera to bracketing and chose to take three pictures. One is overexposed to lighten the shadows; one is underexposed to show the details around the bright sun; and one is in between, where I’ve selected my preferred exposure for most of the image.
The under and over-exposed shots are two stops on either side of the preferred exposure.
To get the best results, you should shoot with a tripod. But, if you’re like me and find yourself without one, burst mode can give you a faster shutter speed to ensure sharp shots. I’d always recommend this if you are doing handheld exposure bracketing, as you want to avoid catching slight movements of your body to keep the composition identical.
Next, I adjust the exposure, so the histogram is clipping off at about the same level on each side of the chart.
FYI - expect highlights to burn out when you have a bright light, i.e. the sun, in shot.
Shoot three frames, one at my preferred exposure and two more 2-stops on either side.
That’s my shot with exposure bracketing in place.
However, I like to get as many great shots to play with as possible! So, I took another few shots, this time adjusting the aperture to create a more starburst effect from the sun.
It’s good to experiment - you never know what you’ll get!
From here, I zip to my office for some post-production. I choose the three shots at different exposures and get stuck into hdr merging and editing. Make sure to see exactly what I do in the video - it’s far easier and more beneficial than explaining in writing ;)
Should you do this type of photography in JPEG or RAW?
There’s no written rule for you to shoot in JPEG or RAW. But, if you choose jpeg, you will need to do more work with your camera settings during the shoot. Otherwise, your camera will create an image at the exposure it thinks works best.
Taking a jpeg also means your camera is doing some post-production work and compressing the file before you get your hands on it. In Adobe’s words, “the camera’s image processor has essentially developed the image already.”
With RAW, all the original picture information and detail is kept on file. You have complete control over what to do with it in post-production.
This is why, in instances like exposure bracketing, I always prefer RAW HDR photography.
Want to learn more when it comes to post-production?
My video is obviously a bit more in-depth, you can see exactly what I do in Adobe Lightroom to bring the photo together.
It’s not a full post-production lesson, but if that is something you’re after; I can help!
I have an Online Post Production Course ‘7 Steps To Perfect Pictures [Lightroom Classic CC]’ available if you want to get stuck into the nitty gritty. It’s a 7-week online course with video lessons and weekly exercises. My RAW files are included so you can work alongside me and get practical experience that will take your raw file development to the next level.
Head over to the product page here to see all the different lessons that are included in the course.
Best wishes...


Products in this Category


| How to Use a Polarising Filter - Photo Biker 26 |