Sunset Shoot PT2 Lightroom

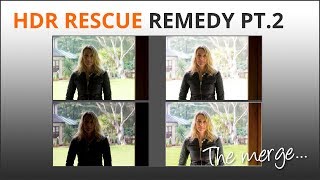
If you missed Manual Sunset Shoot Part 1 we went out and I shot a sunset manually and talked you through what I was doing, why and how thanks to the histogram, you can be certain you’ve captured the maximum data possible so the Raw and be developed to its full potential.
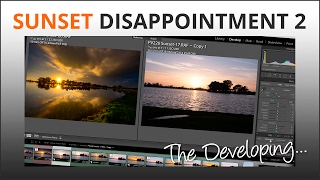
Now let's look at the pics and I’ll give you some tips to avoid the number one Lightroom mistake I see time and again - over developing. Overdeveloping an image makes it look plain weird. To coin a phrase, it makes an image look like it’s been ‘Photoshopped’. (And I don’t mean an HDR ‘look’ which is not my personal taste, but a highly saturated, ultra sharp image is a creative choice for the photographer.)
It’s very tempting to try and make images more punchy than they really were, but in my experience you images will be so much more powerful if you resist this temptation. Shooting a rather low key sunset like we did then over-doing it gives viewers the impression the photographer doesn’t have any emotional investment or genuine interest in the subject at all. Like this for example …

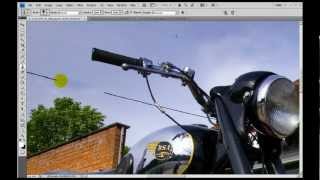
Whacking sliders about, pushing saturation, vibrance and dehaze too far up whilst crushing highlights should be avoided. As should careless brushwork which looks careless. If you want your viewer to be invested in your images - you must curb your enthusiasm and invest of yourself with time and patience.

Doesn’t this one look a whole lot nicer? When working on an image, remember what it was really like when you shot it. Bring things that were there to life and make them look how your eyes saw it, but don’t try adding something that wasn’t by over dramatising it.
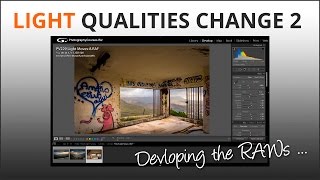
Lightroom work is a holistic process
The problem we face is the idea we can make anything look good on post production. That if we shoot loads and maybe bracket we can ‘fix it’ later on. But that leads us to further impatience as we rush from image to image wildly shoving sliders around to see which one’s ‘best’.
- Slow down, shoot less and consider what you do shoot carefully
- Ensure exposures are accurate for the scene in camera
- Use sliders for overall adjustment
- Use brushes and grads for local adjustments
- Avoid halos and overlaps by zooming in and being careful around edges when brushing
- Many small local adjustments bring scenes to life and look natural
- Be subtle
- Work back and forth, add a brush stroke, change a slider, go back to the brush...
- Be patient
Post production is the same as any skill and you have to experiment to begin with. It’s the only way to learn. But don’t just settle for bright and colourful and better than it was. When something looks ‘wrong’, ask yourself why and what it needs to come good. The best way to compare what you’ve done is to make virtual copies, make changes then see what works best and what doesn’t.
As your skill and experience grows over time, you’ll become faster because you’ll recognise at a glance what needs to be done. Patience is the key word because Rome wasn’t built in a day. I’ve been using Lightroom professionally since CS3 Version 2.0 in 2008 - and am continuously learning more, both creatively and discovering new ways of working as Adobe add tools and refine the systems.
Planning Comes With Practise
I used to print my own work in a dark room using an enlarger, chemical trays and little bits of cut out cardboard to make localised changes in exposure (dodging and burning). There were many many time and money consuming mistakes along the way and print after print went in the bin and a print began again from scratch. But with time and practise the number of keepers increased and I began to recognise what needed doing at the start of the process, instead of the end.
How lucky are we now to sit comfortably and quickly experiment to our hearts content without it costing a penny? I think we’ve become so used to a quick fix, a hack, instant gratification we don’t expect to have to try. (That’s why there’s so many Lightroom Presets on the market.) You want something? Pop online and it’ll be with you in the morning if not within seconds. No more traipsing round the shops all day for me. And thank God for that. But it doesn’t work that way when what we want is a personal skill. Great skill is a direct reflection of time and effort invested. Lightroom Presets are an OK starting point, but each image is individual. How can another photographer know what You shot or how You want Your final image to look?
I’ve tried presets, even made a bunch of my own, but beyond camera specific basics such as the XT-2 which always needs 15% less contrast or D600 which always needs +10 vibrance, I find trying presets to see what works best takes longer than developing an image from scratch.
If you get it right in camera and know how to be effective with the fantastic tools in Lightroom you can be creative, fast and efficient. If you’d like me to show you how I do it get stuck into my online Lightroom courses.
7 Steps To Workflow Mastery gives you time saving ways to manage files, catalogs and get LR to do a bunch of work for you on import.
7 Steps To Perfect Pictures is all you need to master the creative side of post production so your images are powerful and naturally dramatic.
Stay happy till next time…